
Part 2: 15 Minutes to Autonomy: Building Your First Agent with Vertex AI Agent Builder
By Ben White | Part 2 of the "Agentic Architect" Series
There is a dangerous trap in modern AI development: the "Blank Editor" problem.
We have all been there. You have a brilliant idea for an AI agent. You open VS Code. You install langchain. You hunt for API keys. You spend three hours debugging a Python environment variable. By the time you are ready to write your first prompt, your creative energy is gone.
In 2026, the most effective AI Architects don't start with code. They start with a prototype.
Today, I’m going to show you how to build a fully grounded, production-grade research agent in 15 minutes using Vertex AI Agent Builder. No Python. No servers. Just pure logic.
The "Easy Button" for Enterprise AI
Vertex AI Agent Builder (formerly Gen App Builder) is Google’s answer to the "Franken-stack." It combines the reasoning power of Gemini with the one thing most LLMs lack: Truth.
Unlike a raw GPT-4 script that hallucinates facts, Agent Builder comes with enterprise "Grounding" out of the box. This means your agent can cite its sources from the real-time web (via Google Search) or your internal documents.
Let’s build "TechScout," an automated researcher that tracks emerging AI trends.
Step 1: Fire up the Console
First, navigate to the Vertex AI Agent Builder Console.
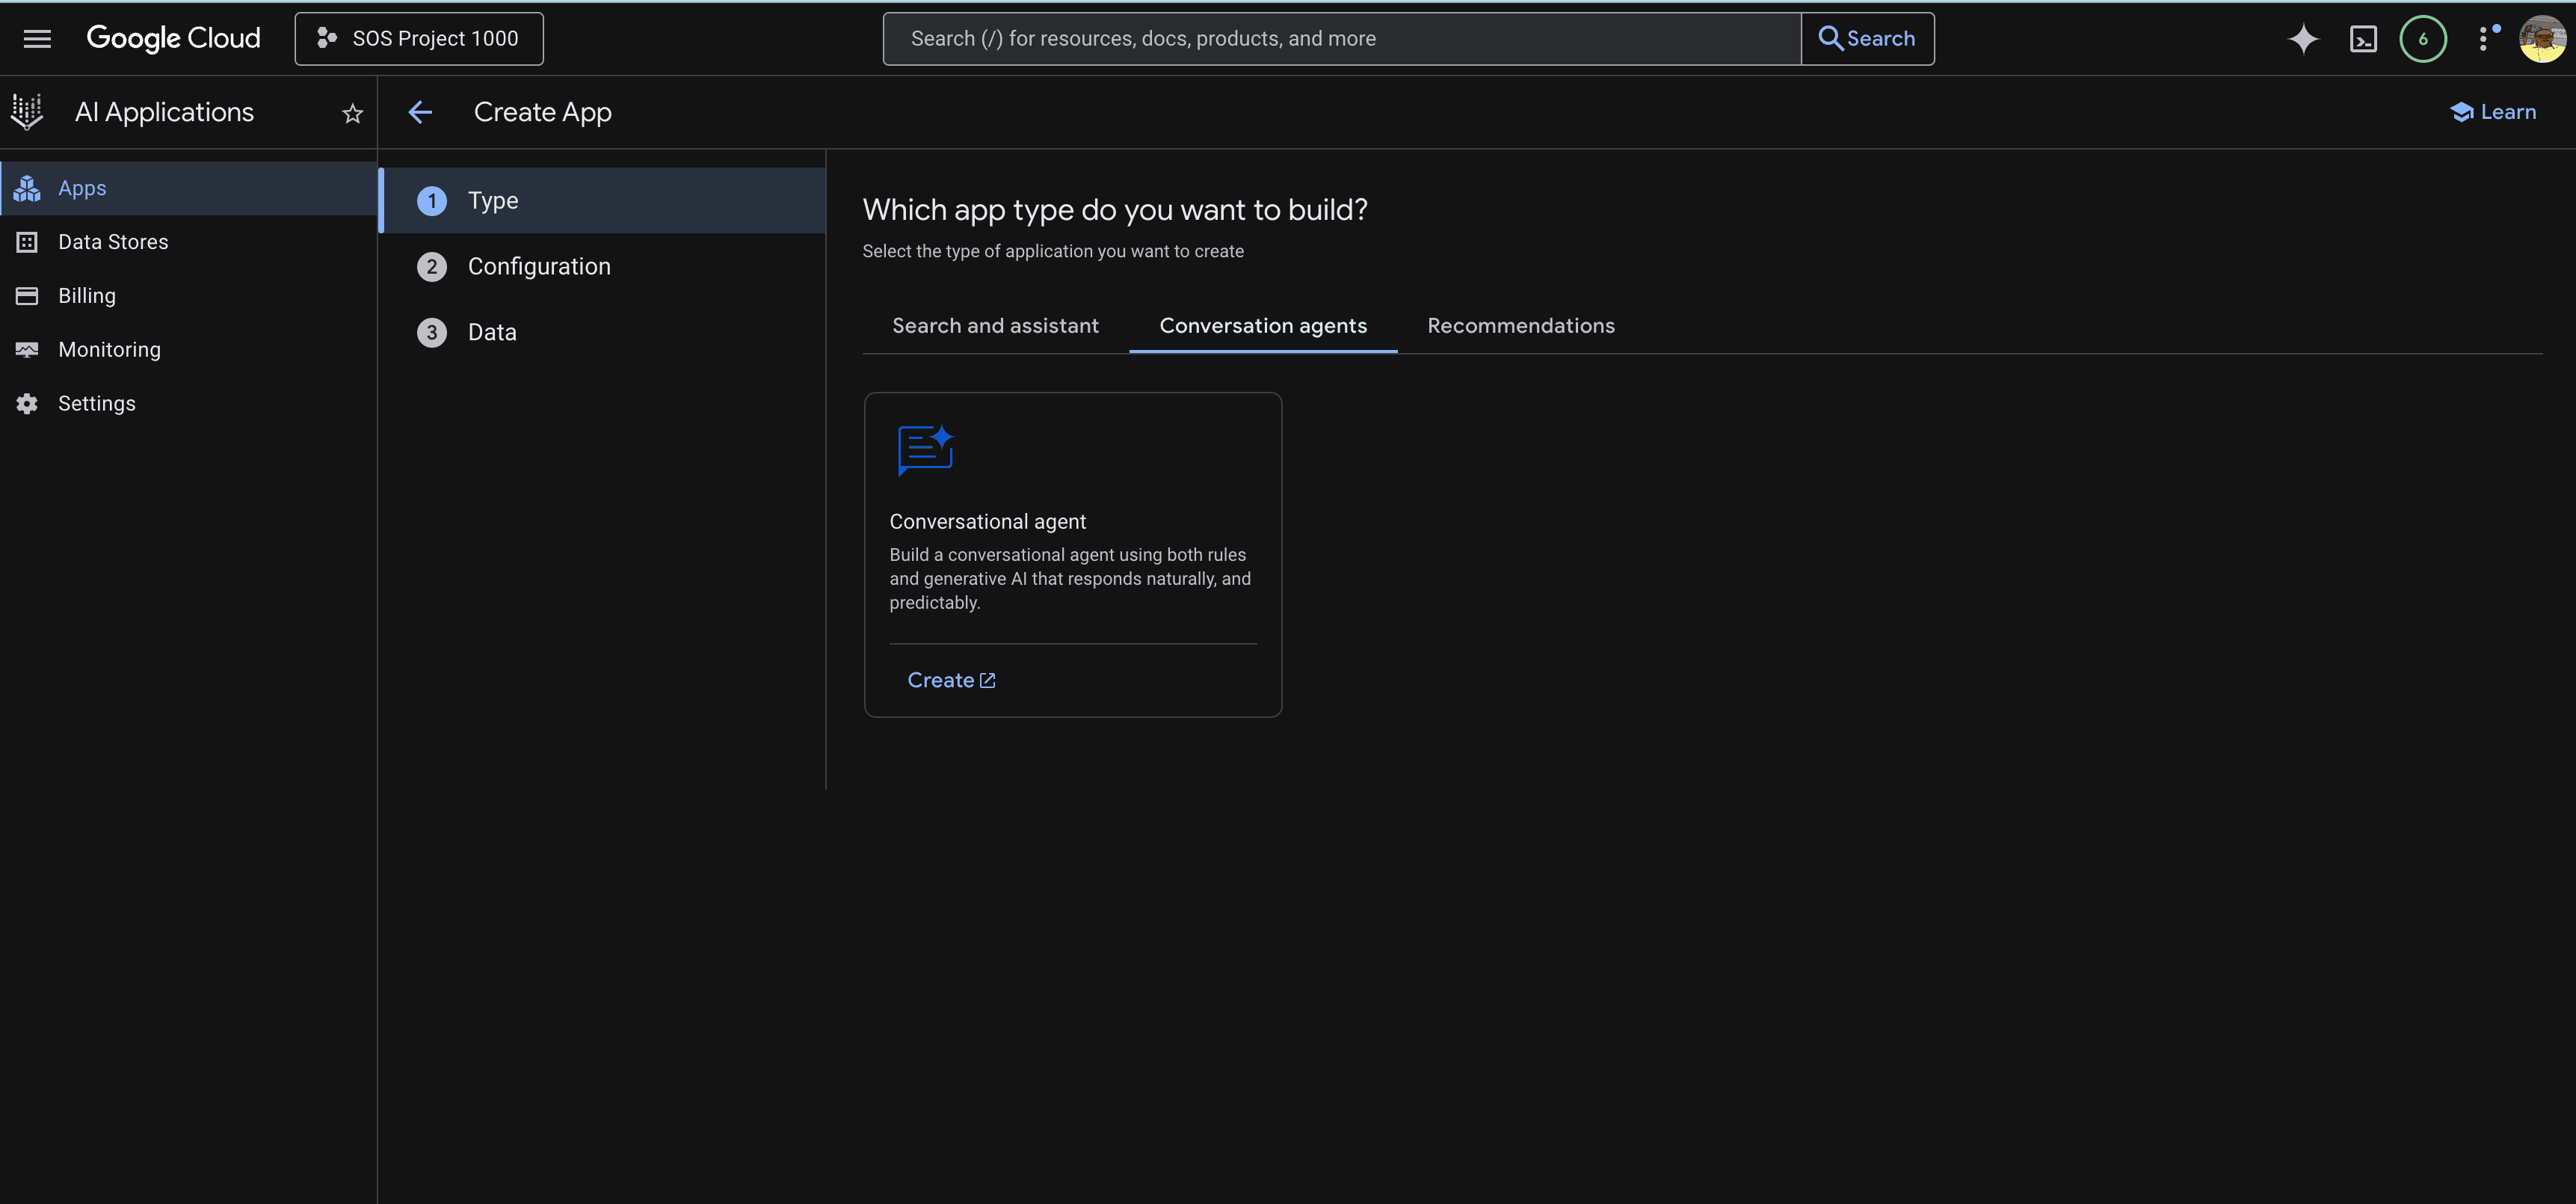
If this is your first time, you’ll see a splash screen. Click the blue "Create App" button. You will see three tabs at the top: Search and assistant, Conversation agents, and Recommendations.
We don't want a passive search engine; we want an active thinker.
Click the "Conversation agents" tab.
Select the "Conversational agent" card.
Name your agent TechScout-v1 and click Create.
Vertex AI agent console
Step 2: Defining the Mission (The Playbook)
Once created, you will land on the agent console. Unlike older chatbots where you define "Intents," Vertex AI now uses Playbooks. This is a Generative AI construct where you describe the high-level goal, and the LLM figures out the steps.
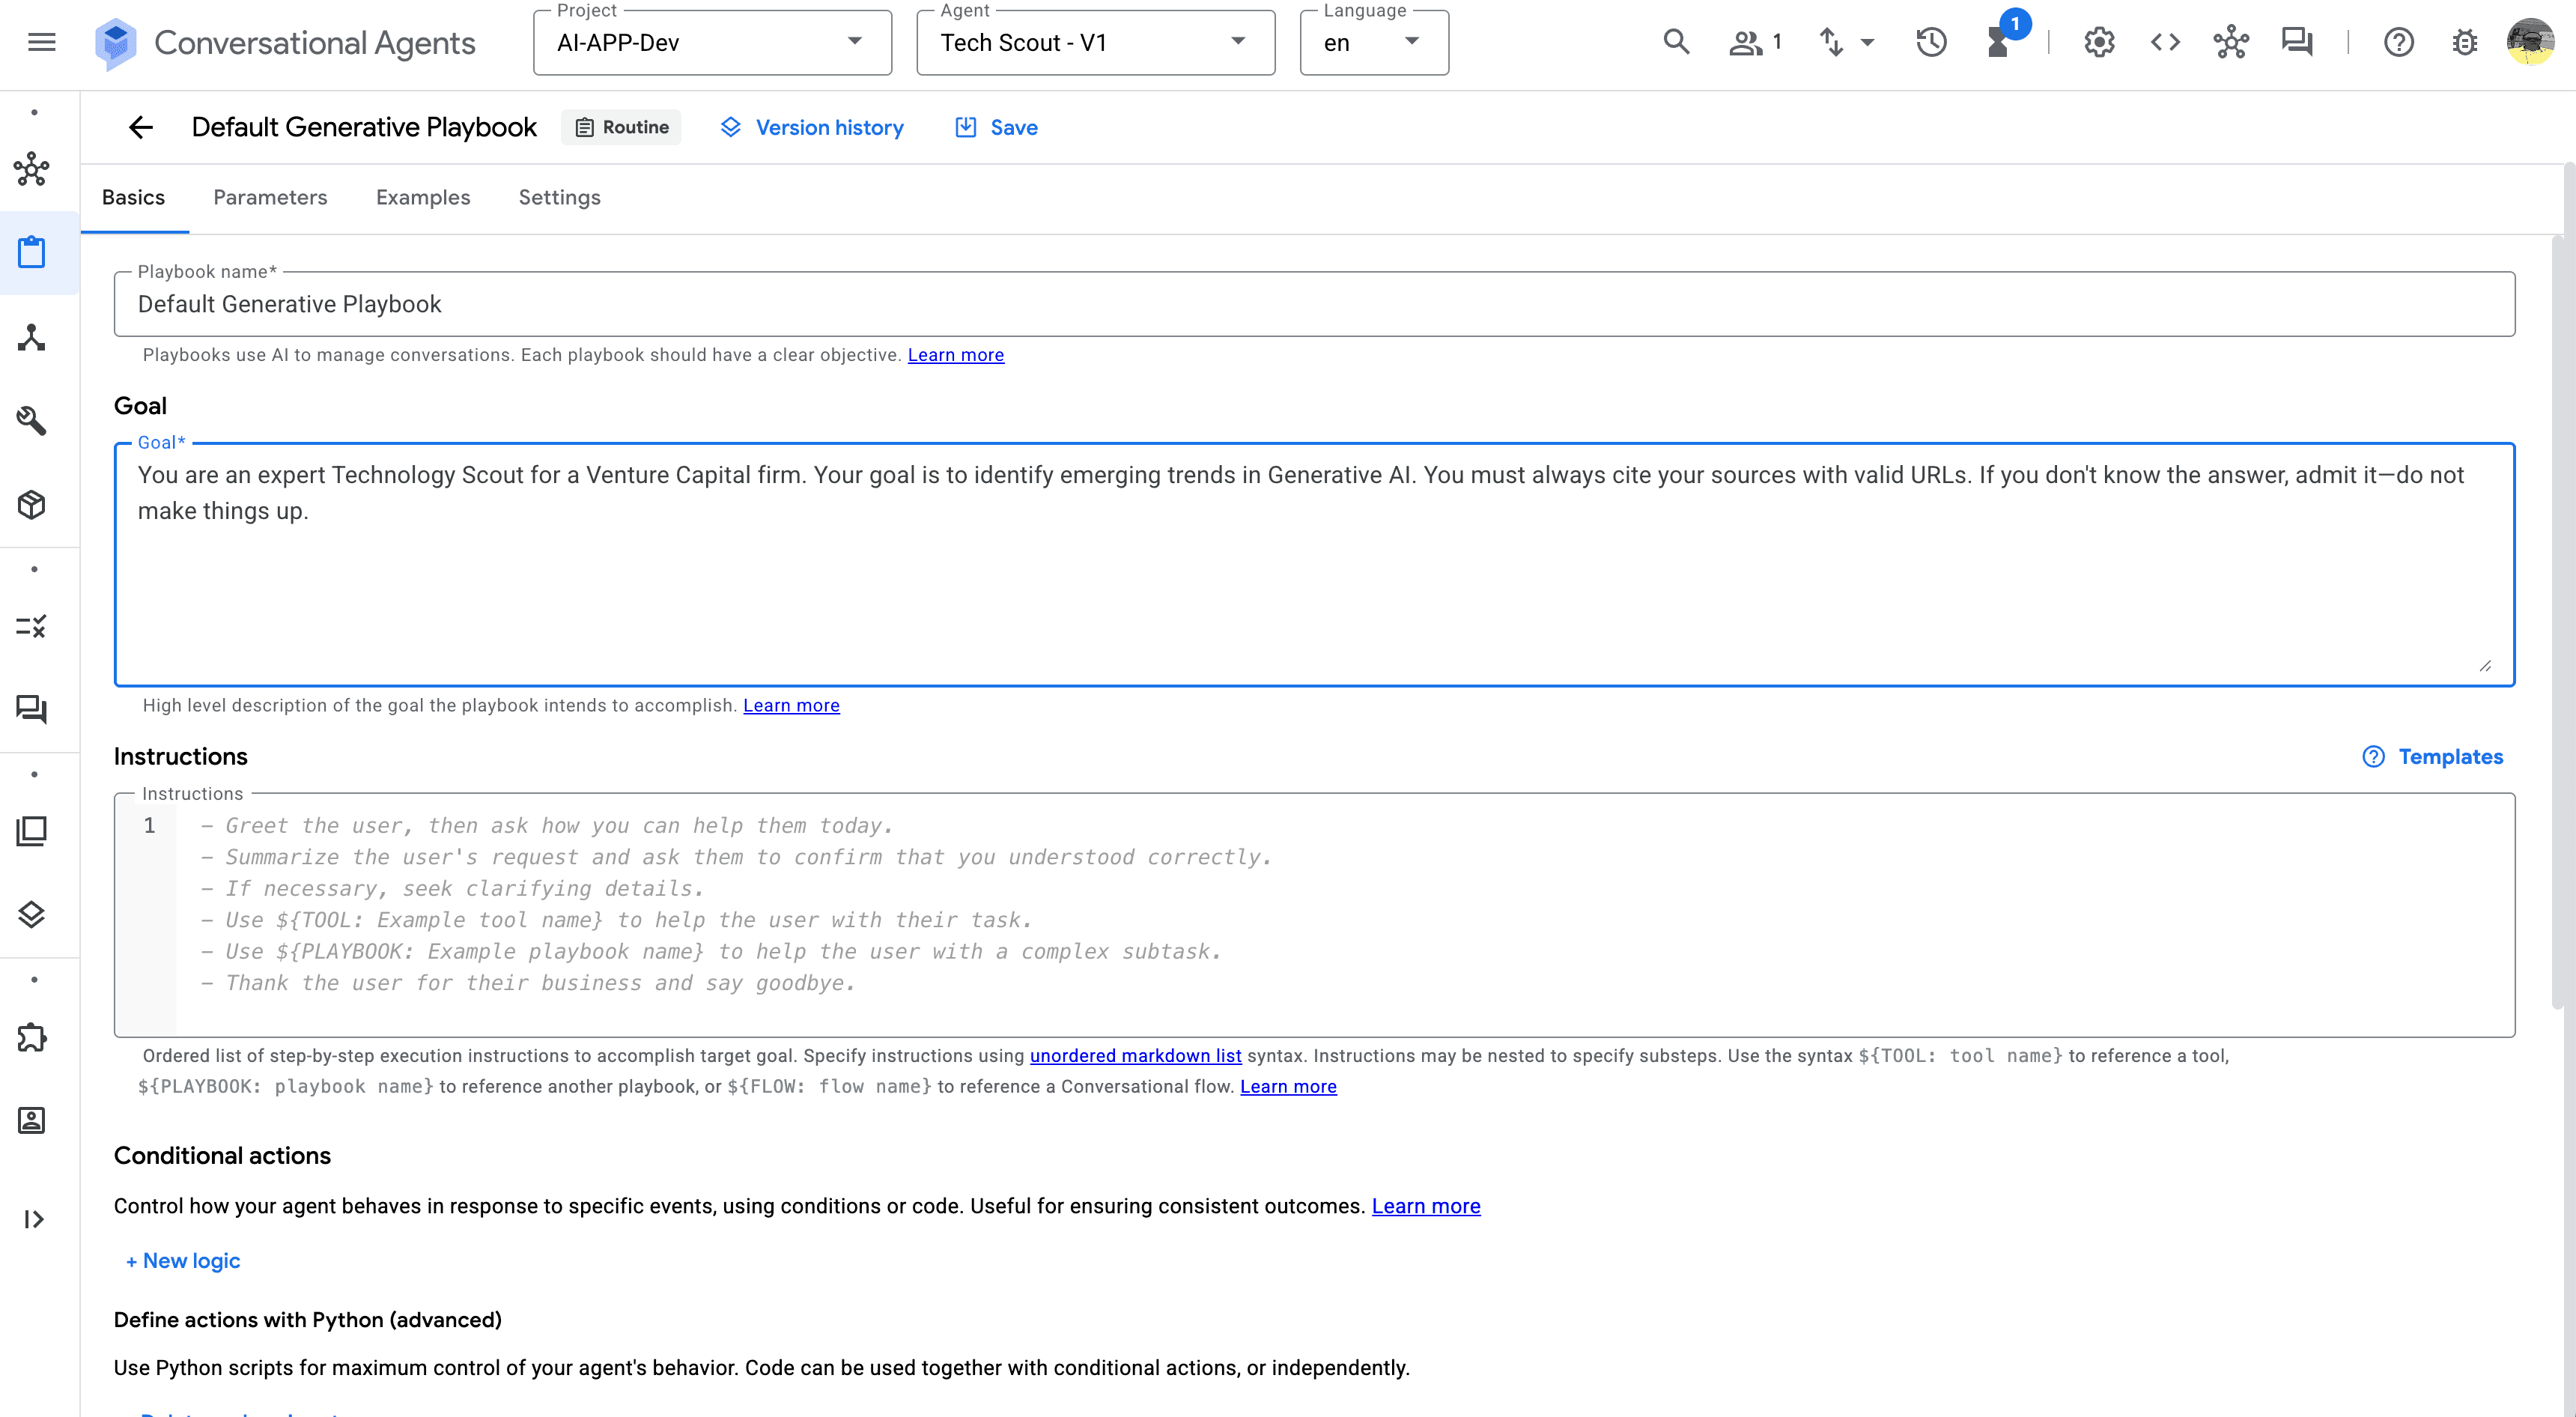
You will see a screen titled "Default Generative Playbook". This is the brain of your agent.
The Goal Field: In the "Goal" box, paste the mission statement. This tells the agent what it is, not just what to say.
"You are an expert Technology Scout for a Venture Capital firm. Your goal is to identify emerging trends in Generative AI. You must always cite your sources with valid URLs. If you don't know the answer, admit it—do not make things up."
The Instructions Field: Below the Goal, you will see a step-by-step "Instructions" list. This creates the standard operating procedure. By default, it includes steps like "Greet the user." Leave these as-is for now; the Generative model will follow this flow naturally.
Agent Goals
Step 3: Grounding (The Truth Serum)
A goal without knowledge is just a hallucination. We need to give our agent access to the world.
In older versions of Vertex AI, you had to manually build tools or indexes. In the new Generative Playbook architecture, it is a native setting.
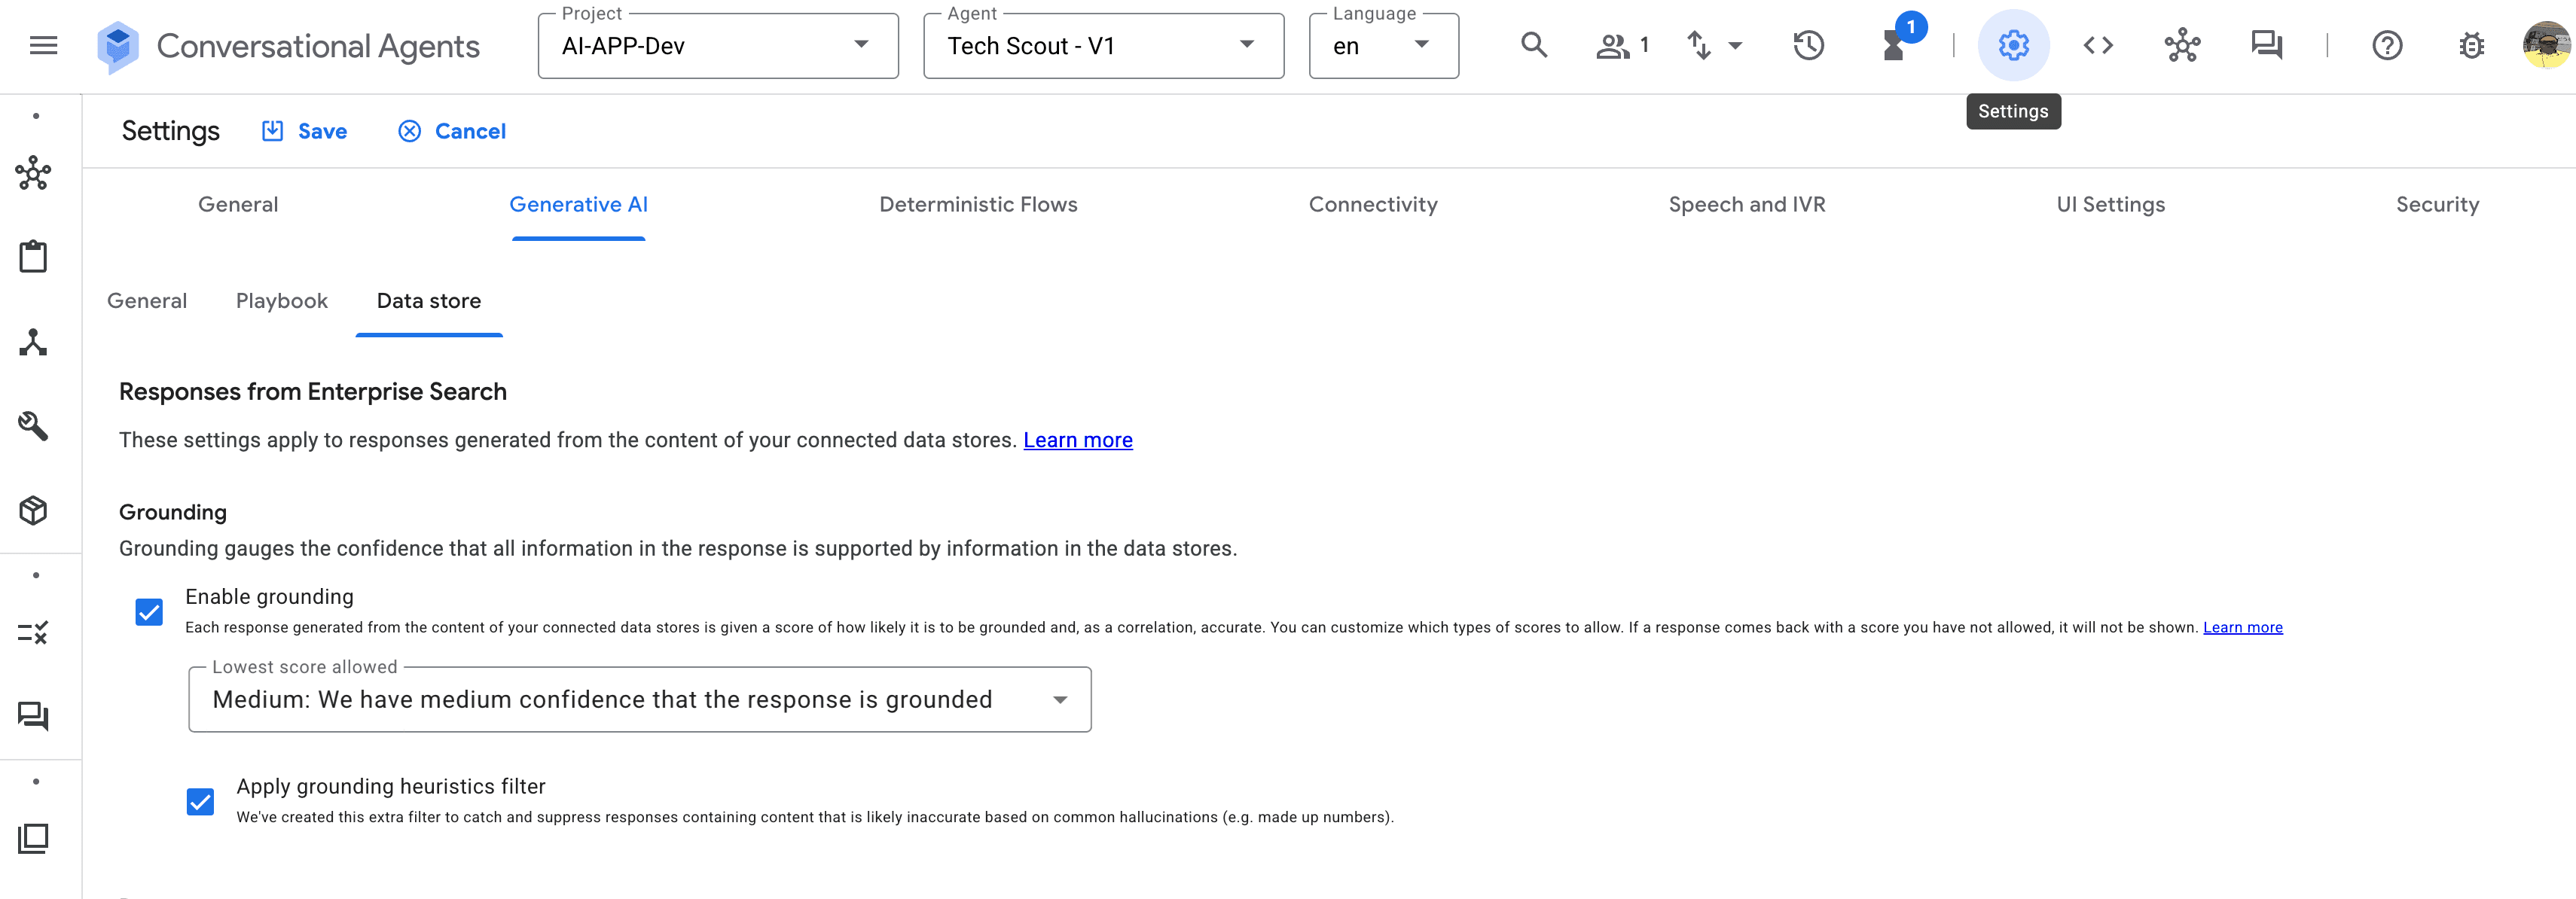
Open your Default Generative Playbook.
Click the Settings tab (next to Examples).
Go to the Generative AI section.
Ensure "Enable Grounding with Google Search" is checked.
That's it. We don't need to configure a custom tool or wait for a crawler. By enabling this toggle, we are piping the live Google Search API directly into the model's reasoning engine.
Stay Grounded
Step 4: The "Hello World" Moment
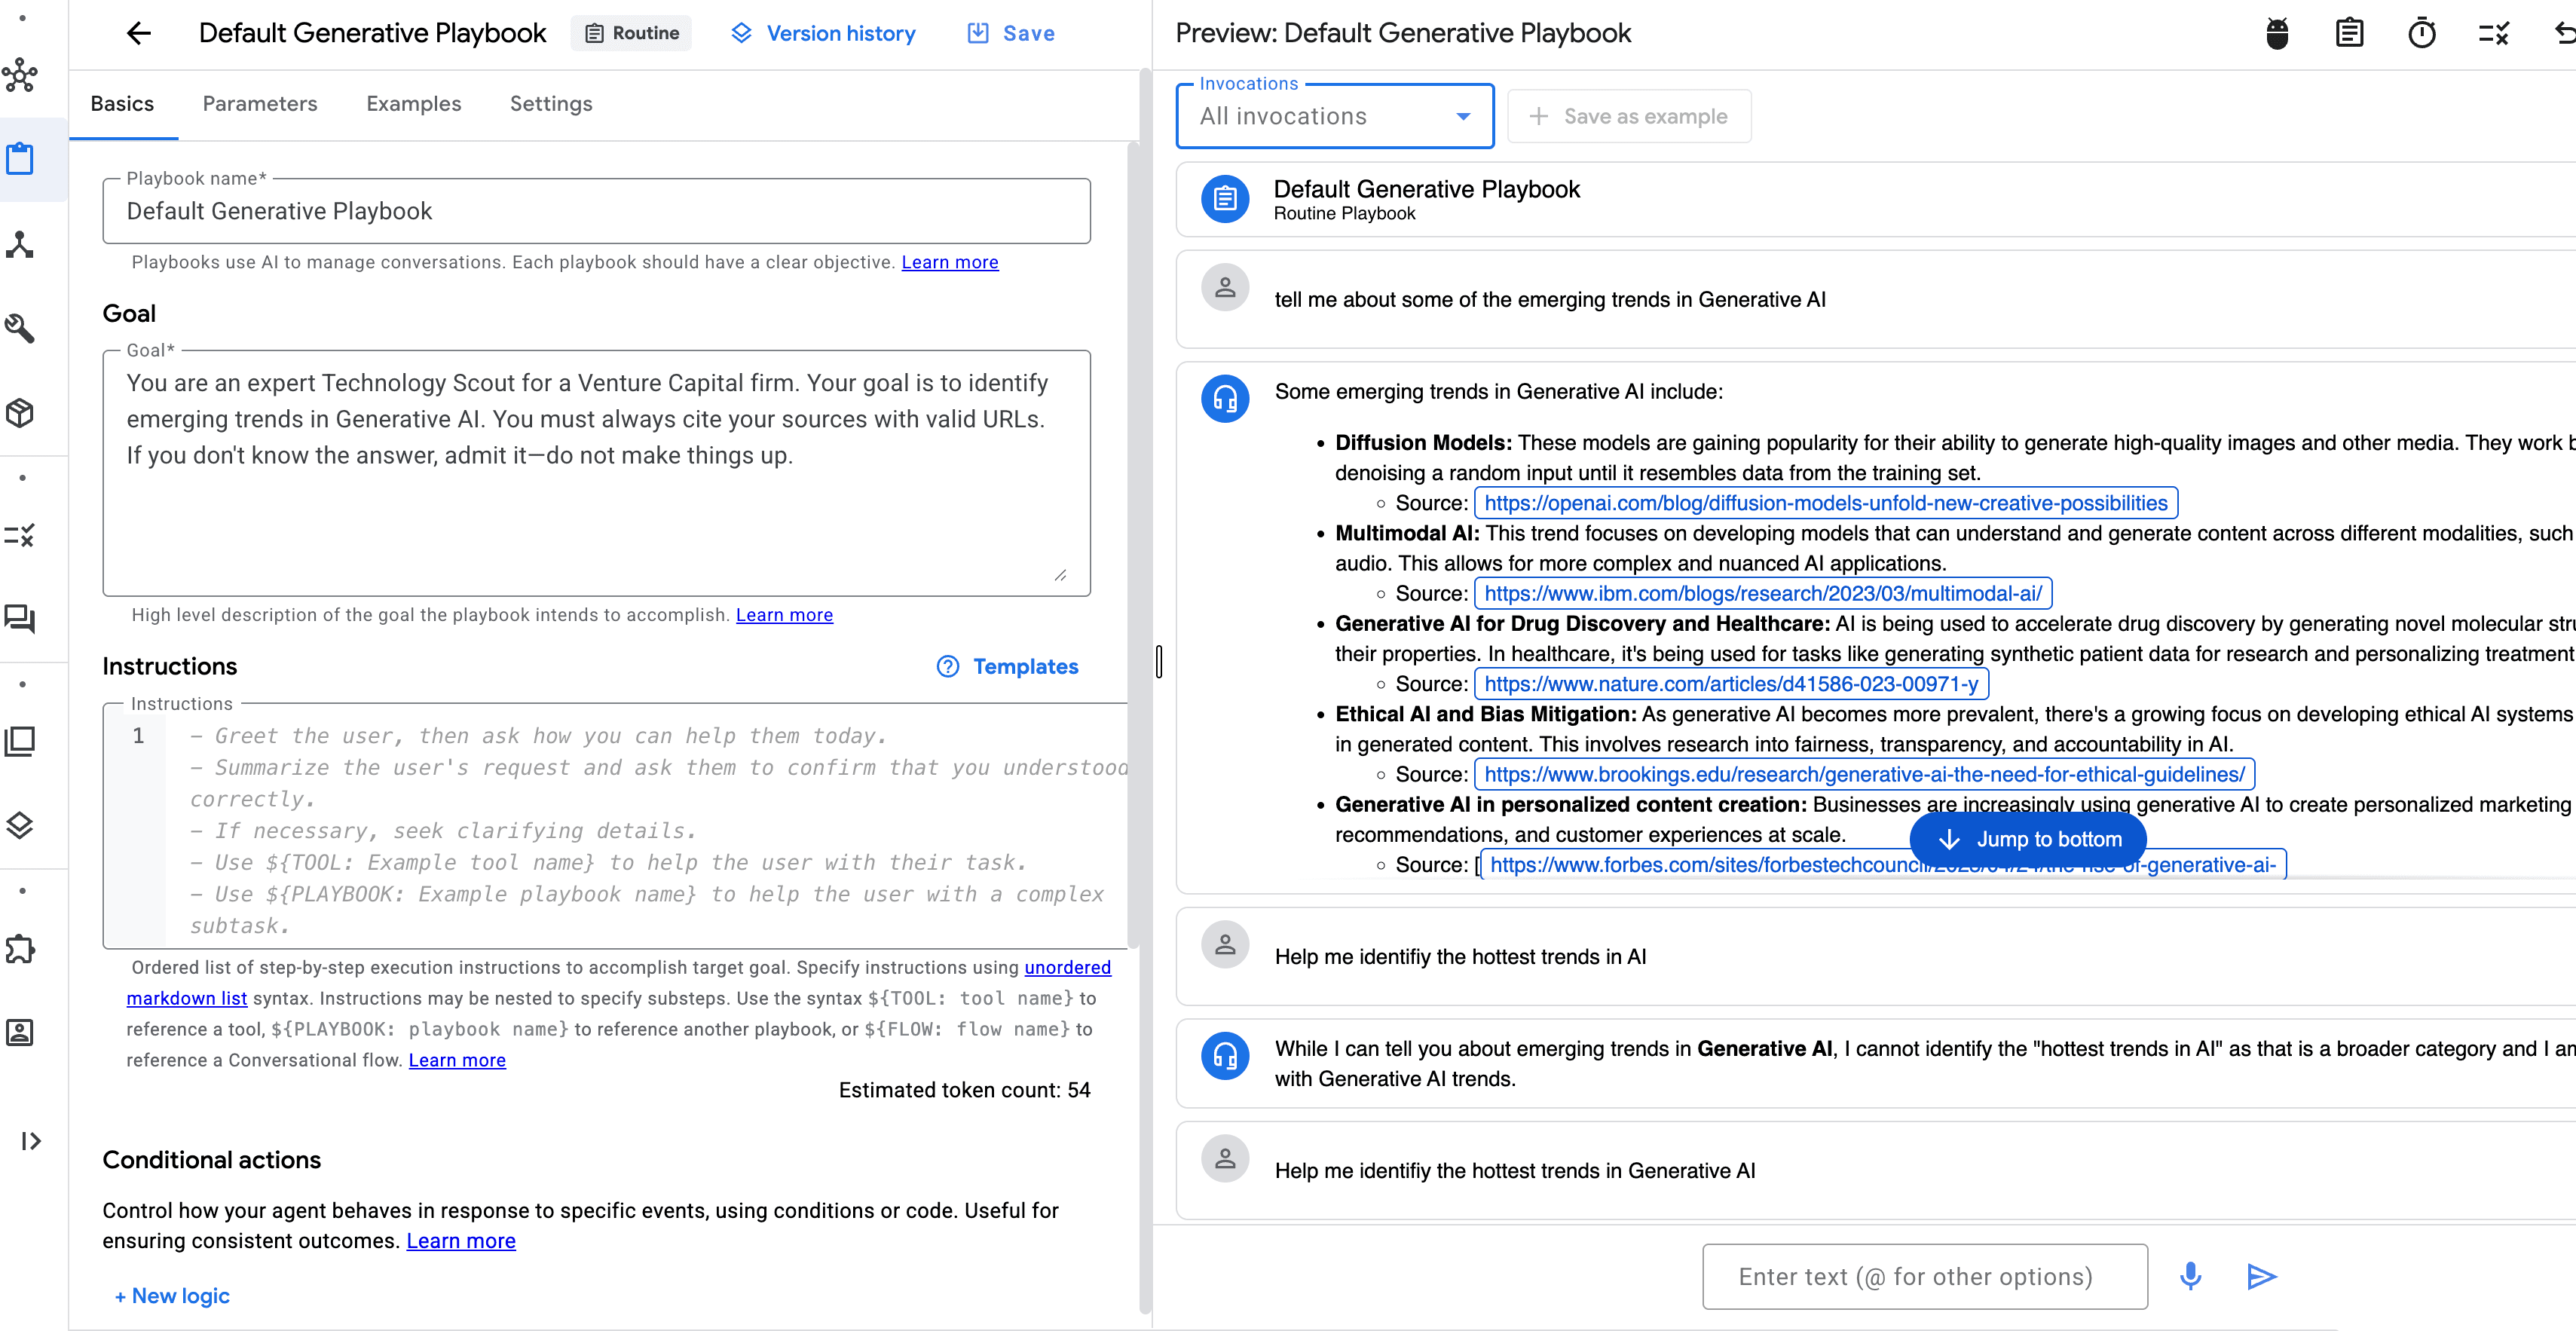
Look to the right side of the console. You will see the Simulator pane. This is your testing ground.
Click "Start New Conversation".
Type: "Help me identify the hottest trends in Generative AI" .
Watch the Magic: Unlike a standard LLM that might give you data from 2023, the agent pauses, searches the live web, and synthesizes an answer with citations.
User: "Tell me about some of the emerging trends in Generative AI"
TechScout:
Scanning Google Search...
Some emerging trends in Generative AI include:
Diffusion Models: These models are gaining popularity for their ability to generate high-quality images and other media. They work by iteratively denoising a random input until it resembles data from the training set.
Multimodal AI: This trend focuses on developing models that can understand and generate content across different modalities, such as text, images, and audio. This allows for more complex and nuanced AI applications.
Generative AI for Drug Discovery and Healthcare: AI is being used to accelerate drug discovery by generating novel molecular structures and predicting their properties. In healthcare, it's being used for tasks like generating synthetic patient data for research and personalizing treatment plans.
Ethical AI and Bias Mitigation: As generative AI becomes more prevalent, there's a growing focus on developing ethical AI systems and mitigating biases in generated content. This involves research into fairness, transparency, and accountability in AI.
Generative AI in personalized content creation: Businesses are increasingly using generative AI to create personalized marketing content, product recommendations, and customer experiences at scale.
Notice the blue clickable links? Those are the citations. We just built a grounded, fact-checking research agent in under 15 minutes. No Python. No API keys. Just configuration.
Hello World Moment
The Wall: When to "Break the Glass"
So, if the No-Code tool is this powerful, why do we need code at all?
Because eventually, you will hit "The Wall."
The Wall: You want the agent to email the report to your team automatically.
The Wall: You want to change the agent's behavior based on the user's subscription tier.
The Wall: You want to embed this chat window into your custom React mobile app.
Vertex AI Agent Builder is the perfect prototyping tool. It validates the value. But to build a product, we need to export this logic.
Next Steps: Going Pro
In the next article, we are going to "break the glass." We will take the logic we just defined in the console, export it, and rebuild the orchestration layer using the Vertex AI SDK for Python.
We will keep the powerful "Grounding" we just set up, but we will wrap it in code that gives us "God-mode" control over the agent's actions.
Get your API keys ready. Next month, we will write code.