
Part 5: The Deployment Gap: Shipping AI Features with Firebase Genkit
By Ben White | Part 5 of the "Agentic Architect" Series (Phase 2)
We have a problem.
In Part 4, we built an incredible UX-Copilot agent using Google AI Studio. It perfectly analyzes UIs and returns structured Markdown. It’s flawless.
But it only exists in our browser.
This is the "Deployment Gap." It is the graveyard of thousands of cool AI demos. Transitioning a prompt from a playground UI into a scalable, observable, and secure production API is surprisingly painful. If you build it from scratch, you have to write your own Express.js server, manage streaming responses, handle retries, and somehow figure out how to log the LLM traces so you can debug hallucinations later.
Today, we skip all of that. We are going to deploy our UX-Copilot using Firebase Genkit.
Why Firebase Genkit?
Genkit is Google’s open-source framework designed specifically for shipping production AI. We are using it instead of raw SDKs because it gives us three superpowers out of the box:
Flows: It treats AI operations as strongly typed functions (using Zod for validation).
The Developer UI: It provides a local web dashboard to test our code and inspect the exact traces of what the LLM is doing.
One-Command Deployment: We can ship our code directly to Google Cloud Functions as a serverless API.
Let's write some TypeScript.
🛑 Prerequisites before we start: Make sure you have Node.js installed, and then grab the official CLI tools globally by running this in your terminal:
npm install -g firebase-tools genkit-cli
firebase login
Step 1: The Setup
Instead of manually installing dependencies, we should use the official Firebase and Genkit CLI tools. It wires everything up automatically.
Run these commands in your terminal:
# 1. Create the project folder
mkdir ux-copilot
cd ux-copilot
# 2. Initialize Firebase Functions (Select TypeScript when prompted)
firebase init functions
# 3. Move into the functions directory
cd functions
# 4. Initialize Genkit (This auto-installs the Google AI & Firebase plugins!)
npm install @genkit-ai/google-genai
npm install @genkit-ai/express
Set your API key in your terminal so the local environment can talk to Gemini:
export GOOGLE_GENAI_API_KEY="your-api-key-here"
Step 2: Defining the "Flow"
In standard backend development, you build "Routes" or "Endpoints." In Genkit, you build Flows. A Flow is an observable function that encapsulates your AI logic.
Navigate to the file functions/src/ index.ts. We are going to replace the contents of this file with the code below; to port the exact System Instruction we wrote in Part 4 into this file.
import {genkit, z} from "genkit";
import {googleAI} from "@genkit-ai/google-genai";
import {onCallGenkit} from "firebase-functions/https";
// 1. Initialize Genkit
const ai = genkit({
  plugins: [googleAI()],
});
// 2. The Isolated System Instruction
const UX_SYSTEM_PROMPT =
  "ROLE: You are an elite Lead UX/UI Designer.\n" +
  "CONTEXT: Analyze the visual hierarchy, color contrast, and " +
  "user flow of the provided UI description or image.\n" +
  "CONSTRAINTS: Be brutally honest. Do not write code.\n" +
  "OUTPUT FORMAT: Strict markdown using 🔴 Critical, " +
  "🟡 Minor, 🟢 Good headers.";
// 3. Define the Multimodal Flow
export const uxAuditFlow = ai.defineFlow(
  {
    name: "uxAuditFlow",
    inputSchema: z.object({
      textInstruction: z.string().optional(),
      mediaUrl: z.string().optional(),
    }),
    outputSchema: z.string(),
  },
  async (input) => {
    // eslint-disable-next-line @typescript-eslint/no-explicit-any
    const promptParts: any[] = [];
    // 4. Provide a strong User Prompt
    const userText = input.textInstruction ?
      input.textInstruction :
      "Execute a strict UX audit on the attached media according " +
      "to your system instructions.";
    promptParts.push({text: userText});

    // 5. Attach Media with Auto-Detected Content Type
    if (input.mediaUrl) {
      let detectedType = "image/jpeg";
      const urlLower = input.mediaUrl.toLowerCase();

      if (urlLower.includes(".mp4")) detectedType = "video/mp4";
      else if (urlLower.includes(".png")) detectedType = "image/png";
      else if (urlLower.includes(".gif")) detectedType = "image/gif";
      else if (urlLower.includes(".webp")) detectedType = "image/webp";
      promptParts.push({
        media: {
          url: input.mediaUrl,
          contentType: detectedType,
        },
      });
    }
    // 6. The Clean API Call
    const {text} = await ai.generate({
      model: googleAI.model("gemini-2.5-flash"),
      system: UX_SYSTEM_PROMPT,
      prompt: promptParts,
      config: {temperature: 0.2},
    });
    return text;
  },
);

// 7. EXPORT TO FIREBASE
export const uxAuditEndpoint = onCallGenkit(
  {
    authPolicy: () => true,
  },
  uxAuditFlow,
);
Step 3: The Developer UI (The "Aha!" Moment)
If you were using a standard Node server, you'd be writing console.log() statements right now and hitting your endpoint with Postman.
Genkit has a better way. In your terminal, run:
npx genkit start -- npx tsx index.ts
This launches the Genkit Developer UI on localhost:4000.
This is a local playground for your code. It reads your uxAuditFlow and automatically builds a web form based on your Zod inputSchema. In this example you can add a json formatted description of a UI or an image URL, hit "Run", and instantly see the markdown output.
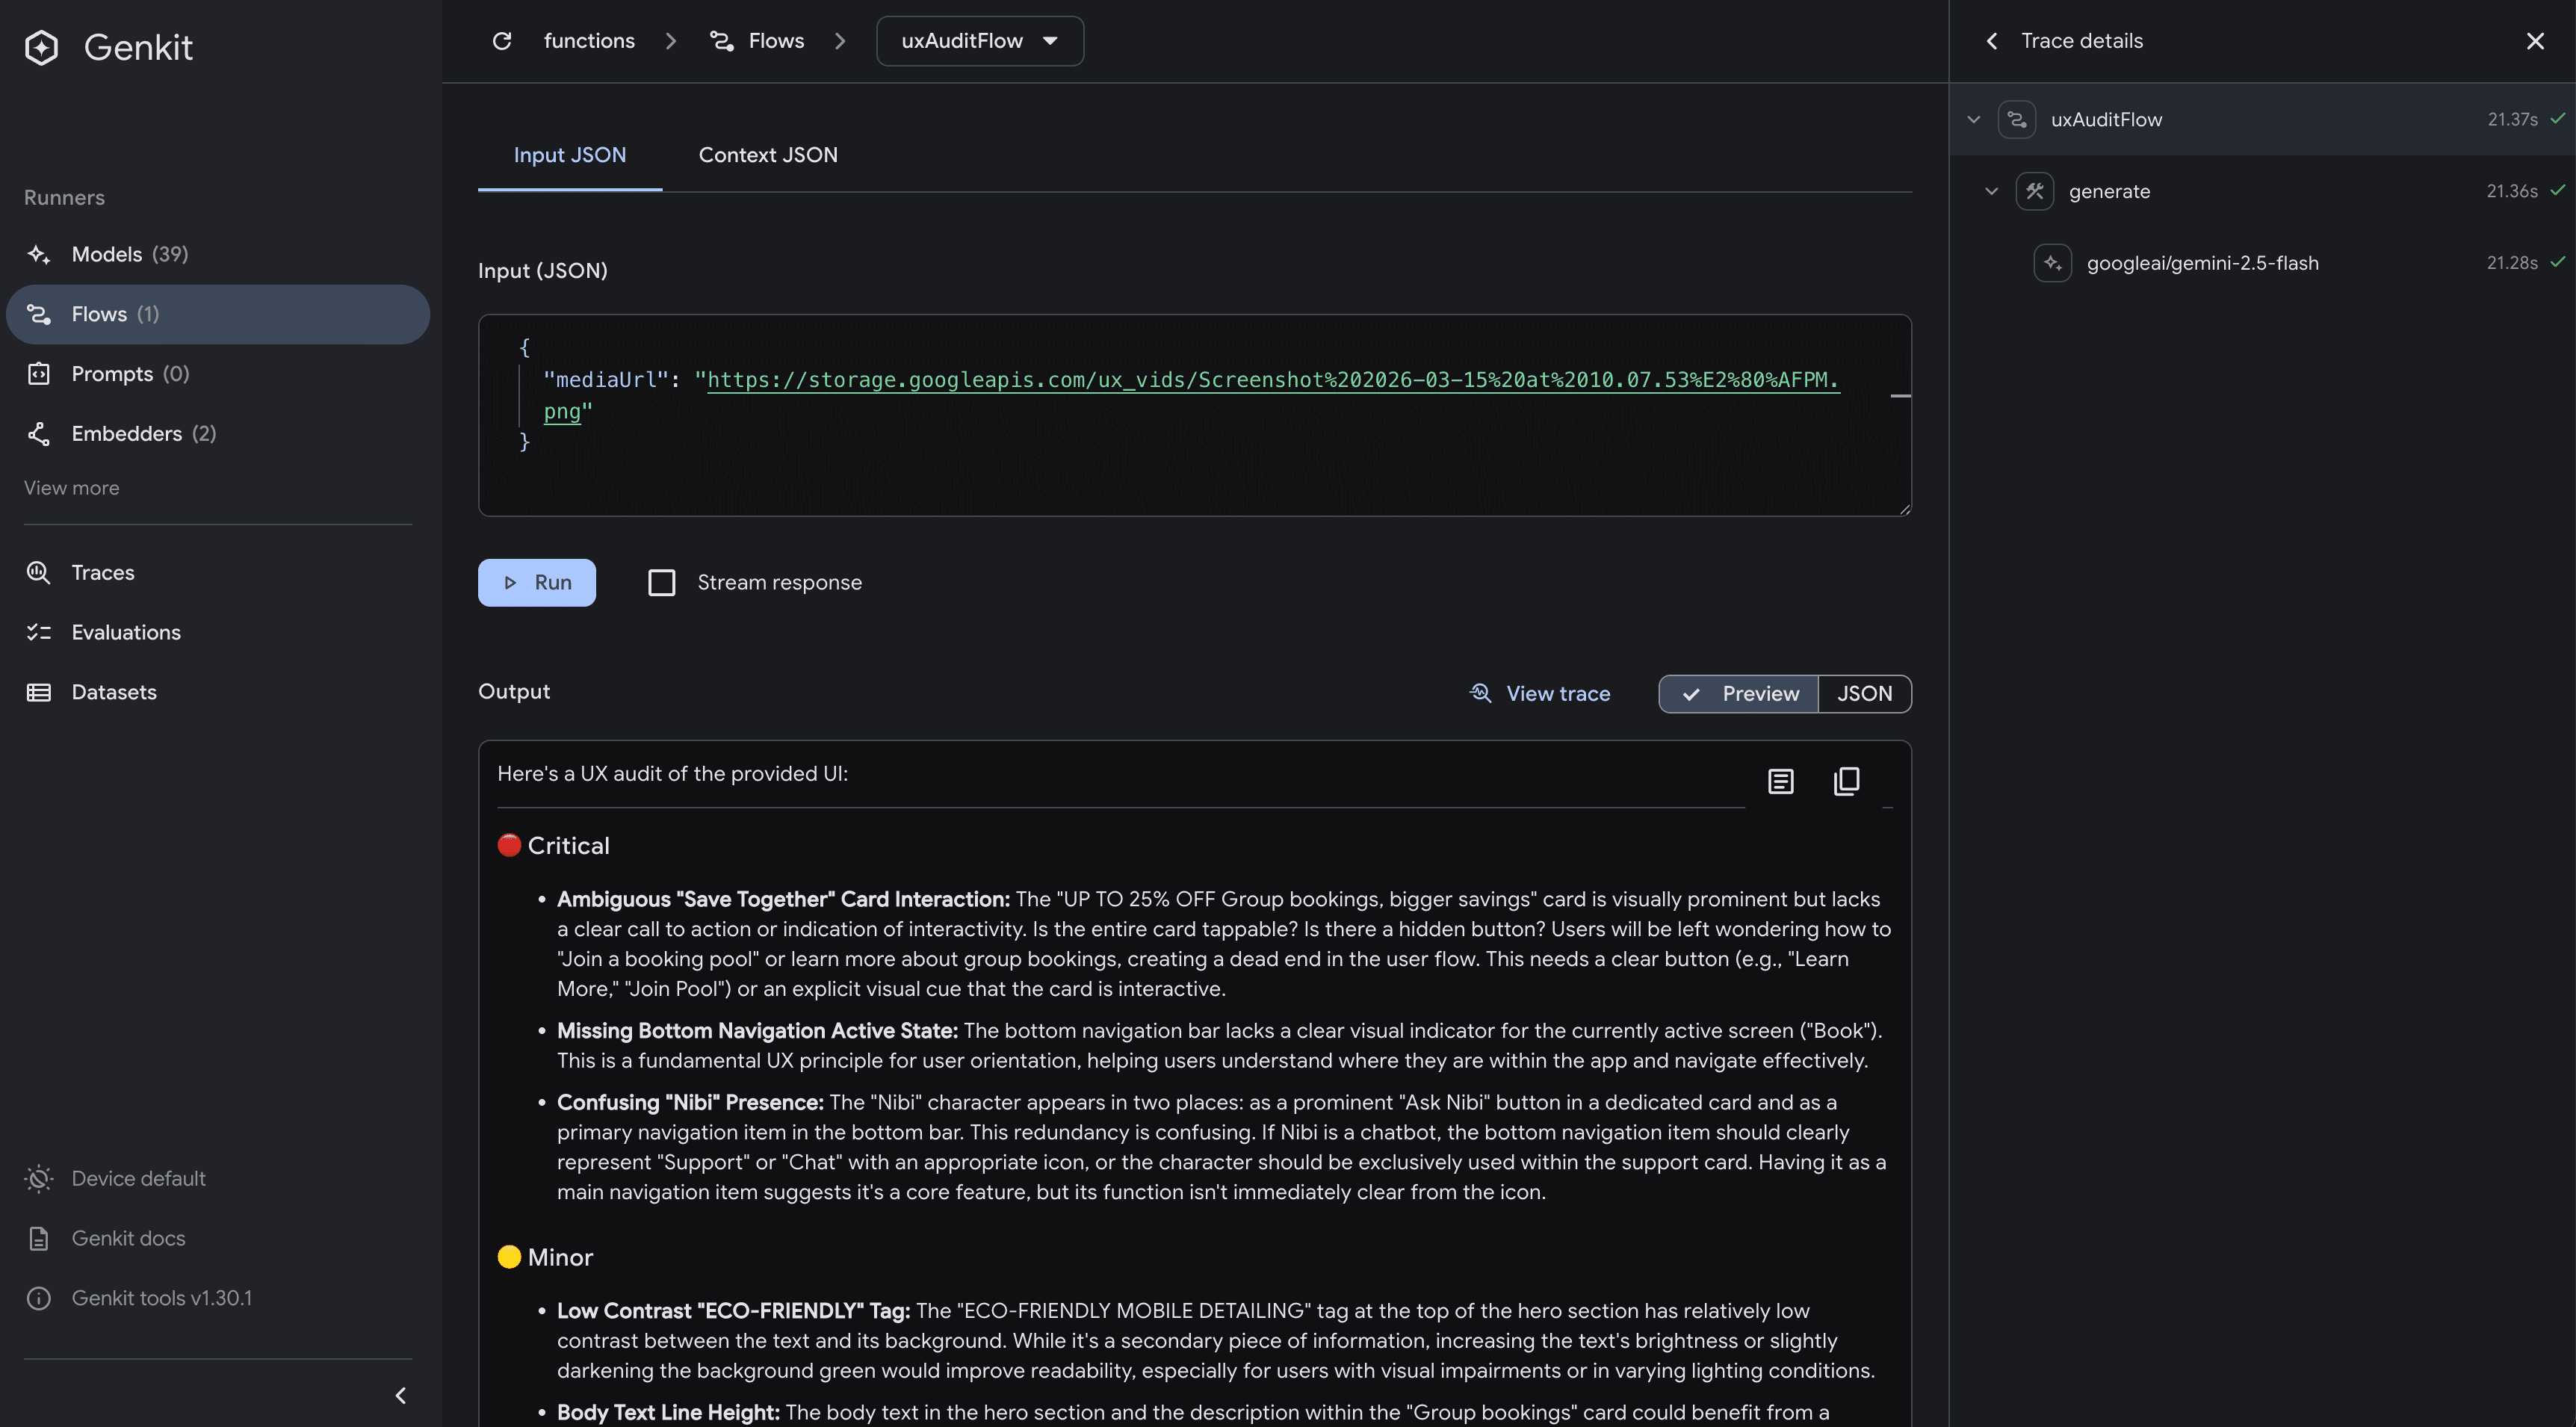
GenKit Console
More importantly, you can click on the Trace tab. It shows you the exact latency, the token count, and the raw JSON payload sent to Google. If your agent ever hallucinates in production, these traces are how you debug it.
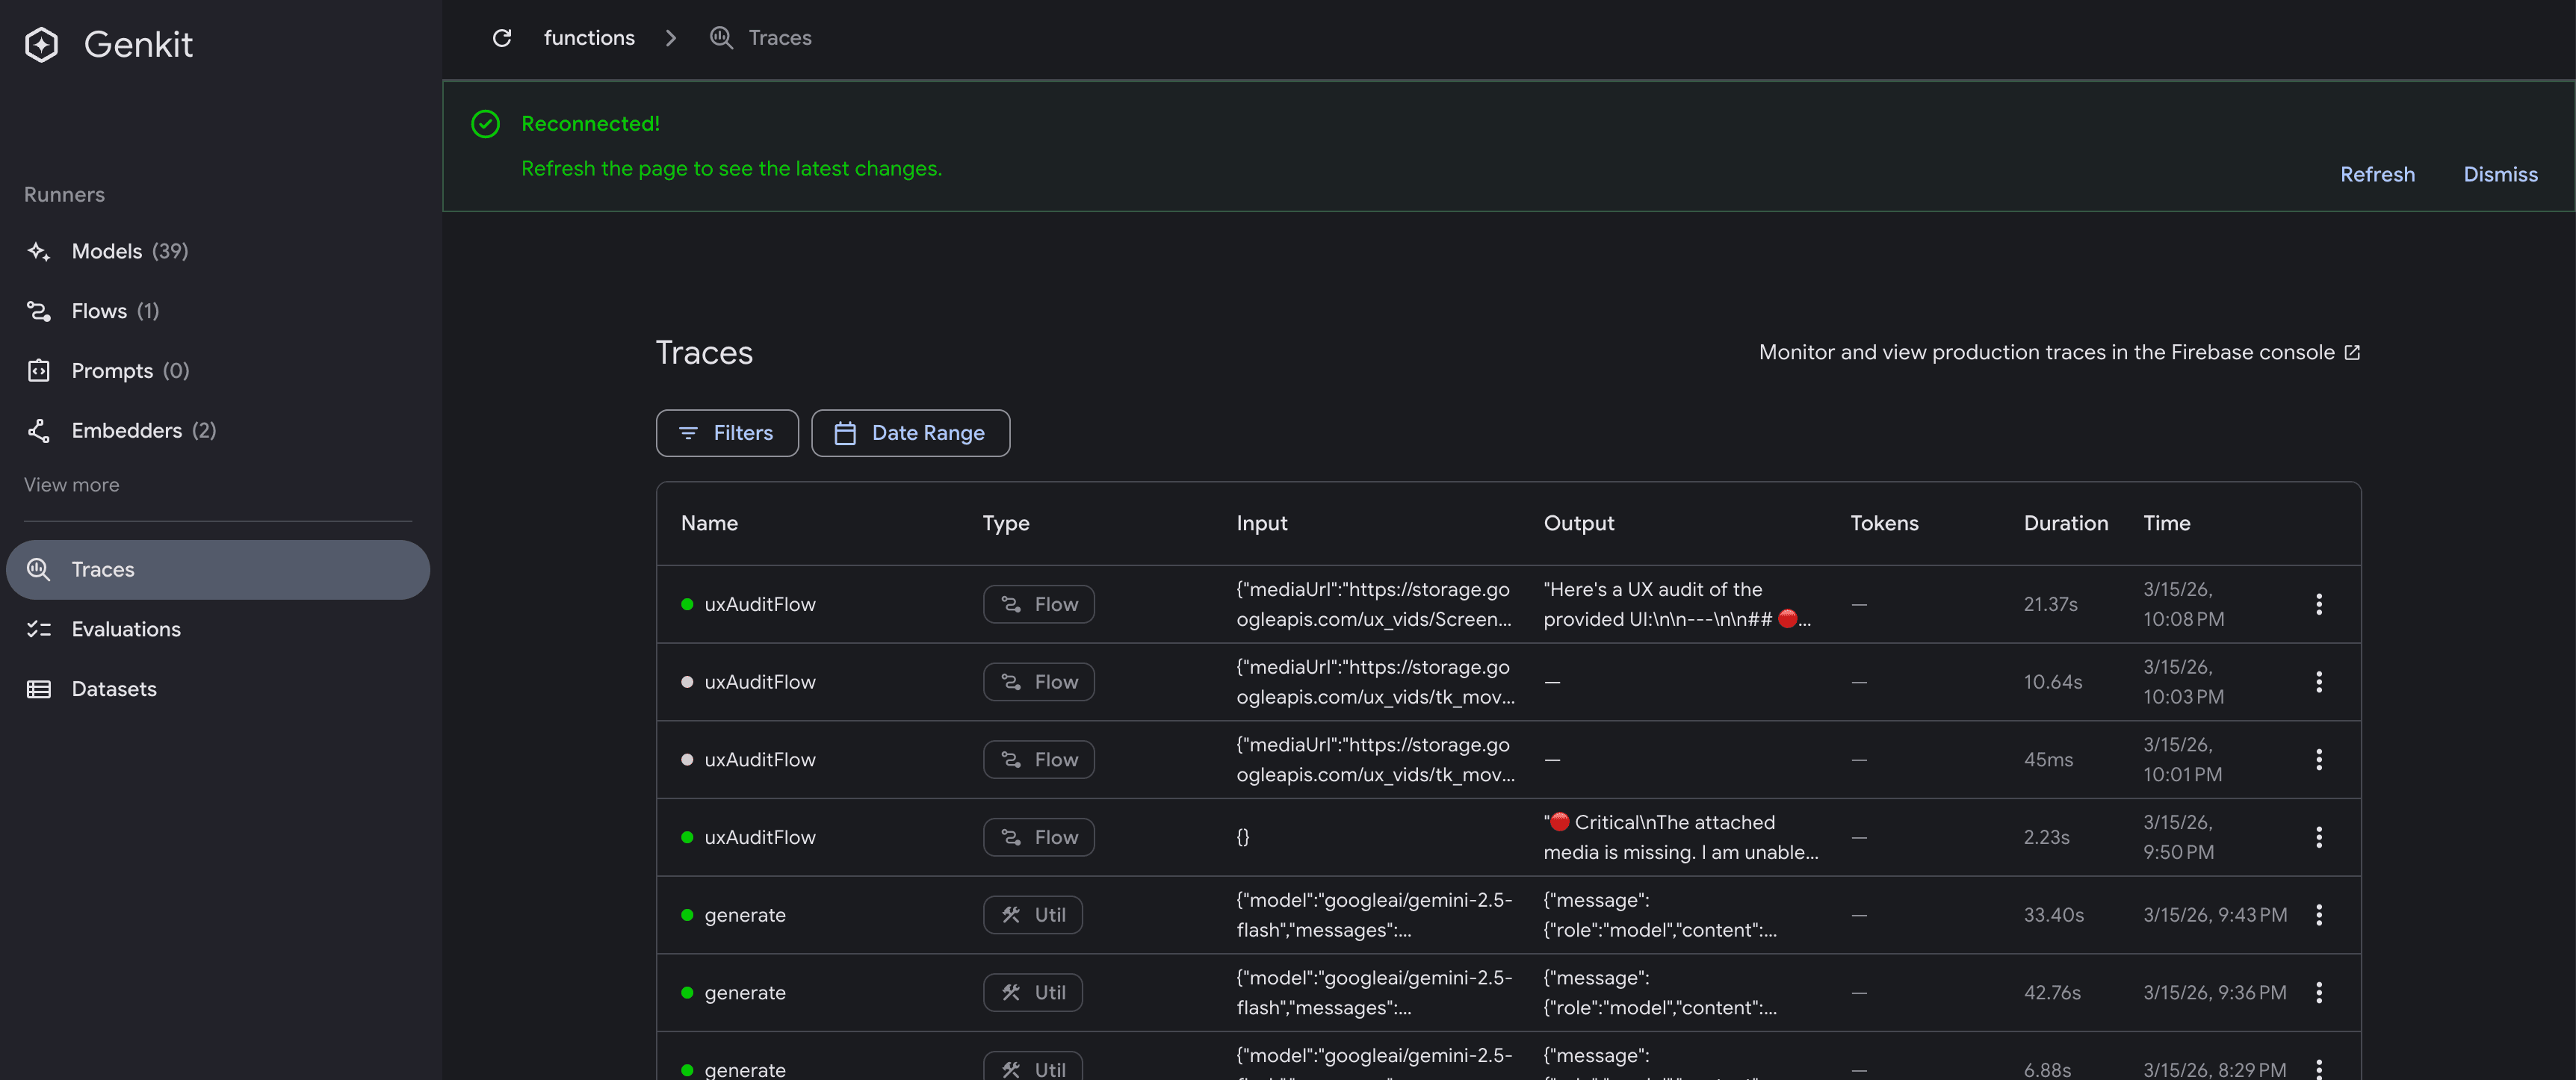
GenKit Trace
Step 4: The Final Mile (Deployment)
We have a working, strongly-typed AI function running locally. Now, we ship it.
Because we built this with Firebase Genkit, deploying it as a secure, serverless HTTP endpoint is trivial.
Since you have the Firebase CLI installed, and we’ve already initialized Firebase functions in your directory (firebase init functions), wrap your Genkit flow in an HTTP handler, and deploy:
But first we need to make sure that our cloud function can access the API_KEY we’ve been using locally.
Up until now, you have been running export GEMINI_API_KEY="..." in your local terminal. That works fine for your MacBook, but when your code lives in Google Cloud, it doesn't have a terminal to read from.
The rookie mistake is hardcoding the key into the index.ts file or trying to commit a .env file to source control. The Architect's way is to use Google Cloud Secret Manager. It encrypts your key at rest and strictly injects it into your function's memory only exactly when it wakes up.
Firebase makes this incredibly easy. Here is how we securely bind your API key to your production endpoint.
Step 1: Store the Secret in Google Cloud
Instead of exporting it locally, we are going to tell Firebase to vault the key in Secret Manager. Run this command in your terminal:
firebase functions:secrets:set GEMINI_API_KEY
The CLI will prompt you to type or paste your value. Paste your actual Gemini API key and hit Enter. (Note: Nothing will show up on screen while you paste it—this is a standard security feature).
Step 2: Bind the Secret in your Code
Right now, your deployed function has no idea it is allowed to access that locked vault. We have to explicitly grant it permission in our index.ts file.
Scroll down to the very bottom of your index.ts file where we export the function. Add the secrets array to the configuration block:
// 7. EXPORT TO FIREBASE
export const uxAuditEndpoint = onCallGenkit(
  {
    authPolicy: () => true,
    secrets: ["GEMINI_API_KEY"], // <--- The Architect's Vault Key
  },
  uxAuditFlow,
);
Why this is best practice:
By simply adding secrets: ["GEMINI_API_KEY"], Firebase does all the heavy lifting. When your function boots up in the cloud, Firebase fetches the encrypted key, decrypts it, and temporarily injects it into process.env.GEMINI_API_KEY.
Because you are using the modern @genkit-ai/google-genai SDK, the googleAI() plugin is already hardwired to look for process.env.GEMINI_API_KEY. It finds the injected secret automatically. You don't have to change a single line of your Genkit logic!
Step 3: Deploy with Permissions
Now let's run the deployment command:
firebase deploy --only functions
Note: The first time you deploy a function with a secret, Firebase might ask you for permission to enable the Secret Manager API or grant the Cloud Function service account access to the secret. Just type y to accept.
The Final Test
Once the deployment finishes, your API is officially production-grade, secure, and ready to be consumed by any frontend.
Within 60 seconds, Google Cloud provisions the server, sets up the HTTPS certificate, and gives you a live endpoint
To see your code in action; paste this in your terminal. (make sure to use your custom url from the deployment output)
curl -X POST https://us-central1-yourproject.cloudfunctions.net/uxAuditEndpoint \
-H "Content-Type: application/json" \
-d '{
"data": {
"mediaUrl": "data:image/png;base64,iVBORw0KGgoAAAANSUhEUgAAAAEAAAABCAQAAAC1HAwCAAAAC0lEQVR42mNkYAAAAAYAAjCB0C8AAAAASUVORK5CYII="
}
}'
You should get our successfully formatted Markdown output back in your terminal! Try replacing the mediaUrl value with an actual URL to an application or web page image.

CURL Output
Phase 2 is Online
Look at what we just accomplished. We took a conceptual prompt from a browser playground and turned it into a production-grade, serverless API endpoint written in TypeScript, complete with strict schema validation and local observability.
Your uxAuditFlow is now live. It is waiting for requests.
In our next post, we finally move to the front end. We will build a simple web interface that calls this exact endpoint, completing our full-stack Agentic Architecture.