Over the course of our Agentic Architect series - Part 2, we have built a verifiably accurate, enterprise-grade AI architecture. We grounded it in private data using RAG (Post 2), cut our cloud costs with Context Caching (Post 3), secured it with middleware interceptors (Post 4), and mathematically proved its accuracy using LLM-as-a-Judge CI/CD pipelines (Post 5).
But every single one of those architectural wins relied on one fundamental assumption: You are allowed to send your data to the cloud.
What happens when you are building an AI for a nuclear power plant? Or a defense contractor? Or a hospital dealing with ultra-strict HIPAA air-gapping requirements?
You can't make an API call to Vertex AI. You have to run the intelligence locally.
Today, we are concluding our deep-code Data Science pivot by stepping off the cloud and onto the edge. We are going to download Google’s open-weights model, Gemma, and run it entirely offline using Python and PyTorch. Finally, we will look at how to fine-tune it to our specific enterprise needs without melting our laptops.
The Enterprise Use Case for Edge AI
In the architecture world, moving from Cloud AI to Edge AI flips your constraints upside down.
Cloud AI: You are constrained by network latency, API costs, and data privacy laws. Compute is infinite.
Edge AI: You have zero network latency, zero API costs, and total data privacy. But your compute (specifically, GPU VRAM) is severely restricted.
To operate on the edge, we cannot use massive frontier models like Gemini 2.5 Pro. We need a model small enough to fit on local hardware, but smart enough to execute enterprise logic.
Meet Gemma
Gemma is a family of lightweight, state-of-the-art open models built from the same research and technology used to create the Gemini models.
Unlike Gemini, which lives behind an API, Gemma’s "weights" (the actual mathematical brain of the model) are open for you to download. For edge deployments, we typically look at the Gemma 2 2B (2 billion parameters) or Gemma 2 9B (9 billion parameters) models. The 2B model is small enough to run smoothly on a standard developer laptop or edge device.
The Code: Running Gemma Locally (Inference)
To run this, we are going to use standard Data Science tooling: Python, PyTorch, and the Hugging Face transformers library.
Note: You will need to accept the Gemma license agreement on Hugging Face and generate a free access token before downloading the weights.
Python
# 1. Install prerequisites in your terminal
# pip install torch transformers accelerate

import torch
from transformers import AutoTokenizer, AutoModelForCausalLM
import os

# Set your Hugging Face Token (Never hardcode this in production!)
os.environ["HF_TOKEN"] = "your_hugging_face_token_here"

# 2. Define the Model
# We are using the Gemma 2 2B Instruct model (tuned for following instructions)
model_id = "google/gemma-2-2b-it"
print("📥 Downloading and loading model weights into memory. This may take a moment...")
# 3. Load the Tokenizer and the Model
# We use device_map="auto" to automatically utilize your GPU if available, or fallback to CPU
tokenizer = AutoTokenizer.from_pretrained(model_id)
model = AutoModelForCausalLM.from_pretrained(
    model_id,
    device_map="auto",
    torch_dtype=torch.bfloat16 # Compresses the model in memory to save VRAM
)
print("✅ Model loaded locally!")
# 4. Create an offline inference function
def run_local_agent(user_prompt: str):
    # Format the prompt using Gemma's specific chat template
    chat = [
        { "role": "user", "content": user_prompt }
    ]
    prompt = tokenizer.apply_chat_template(chat, tokenize=False, add_generation_prompt=True)

    # Convert text to tensors
    inputs = tokenizer.encode(prompt, add_special_tokens=False, return_tensors="pt").to(model.device)

    # Generate the response purely on local compute
    outputs = model.generate(inputs, max_new_tokens=150, temperature=0.3)

    # Decode tensors back to text
    response = tokenizer.decode(outputs[0], skip_special_tokens=True)

    # Clean the output to show only the model's response
    clean_response = response.split("model\n")[-1].strip()
    return clean_response

# 5. The Test (Disconnect your Wi-Fi and run this!)
offline_question = "Summarize the architectural difference between Cloud AI and Edge AI in two sentences."
print(f"User: {offline_question}")
print(f"Edge Agent: {run_local_agent(offline_question)}")
If you disconnect your Wi-Fi and run this script, it will still work. You have successfully captured generative intelligence and caged it on your local machine.
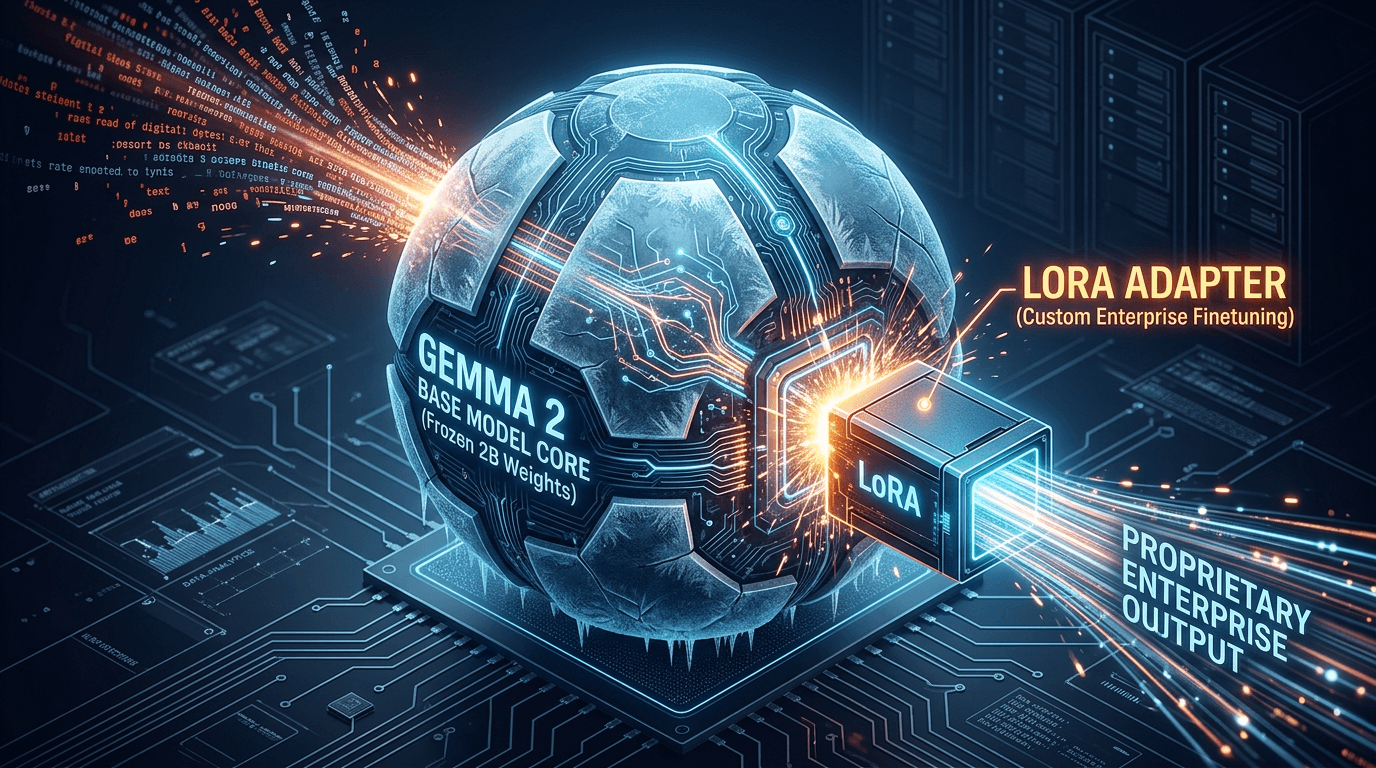
The Next Step: Fine-Tuning with QLoRA
Running the base model is great, but what if Gemma doesn't know your company's proprietary coding language, or you want it to output data in a highly specific JSON schema that it struggles with out-of-the-box?You need to Fine-Tune the model.Historically, updating the mathematical weights of a neural network required a supercomputer and tens of thousands of dollars. Today, we use an architectural cheat code called QLoRA (Quantized Low-Rank Adaptation).How QLoRA works:
Quantization: We crush the massive 2-Billion parameter base model down to 4-bit precision. This shrinks its memory footprint drastically so it fits on a standard consumer GPU.
LoRA: We freeze that 4-bit base model. It cannot be altered. We then bolt on a tiny, train-able "adapter" (a few million parameters) to the side of the neural network.
When you train the model on your proprietary data, you are only updating the tiny adapter.
The Code: Training a Gemma LoRA Adapter
To build this pipeline, we bring in the heavy hitters of the open-source ML ecosystem: Hugging Face’s peft (Parameter-Efficient Fine-Tuning), trl (Transformer Reinforcement Learning), and bitsandbytes (for quantization).
Python
# 1. Install required libraries
# pip install torch transformers peft trl bitsandbytes datasets

import torch
from transformers import AutoTokenizer, AutoModelForCausalLM, BitsAndBytesConfig, TrainingArguments
from peft import LoraConfig, get_peft_model
from trl import SFTTrainer
from datasets import load_dataset

model_id = "google/gemma-2-2b"

# 2. Configure 4-bit Quantization (The "Q" in QLoRA)
# This squeezes the model to fit on consumer hardware
bnb_config = BitsAndBytesConfig(
    load_in_4bit=True,
    bnb_4bit_quant_type="nf4",
    bnb_4bit_compute_dtype=torch.bfloat16
)

print("🧠 Loading quantized base model...")
model = AutoModelForCausalLM.from_pretrained(
    model_id,
    quantization_config=bnb_config,
    device_map="auto"
)
tokenizer = AutoTokenizer.from_pretrained(model_id)

# 3. Define the LoRA Adapter Config
# We are creating the tiny, train-able attachment here
lora_config = LoraConfig(
    r=8, # Rank: The size of the adapter (higher = smarter but slower)
    lora_alpha=16,
    target_modules=["q_proj", "k_proj", "v_proj", "o_proj"], # Which parts of the brain to attach to
    lora_dropout=0.05,
    bias="none",
    task_type="CAUSAL_LM"
)

# Attach the adapter to the frozen model
model = get_peft_model(model, lora_config)
print(f"✅ LoRA Adapter attached! Trainable parameters: {model.get_trainable_parameters()}")

# 4. Load your Enterprise Dataset
# Assume a JSONL file with a 'text' column containing formatted prompt/response pairs
# e.g., {"text": "User: What is project Phoenix?\nAgent: Project Phoenix is our Q3 migration plan."}
dataset = load_dataset("json", data_files="enterprise_training_data.json", split="train")

# 5. Initialize the Trainer
trainer = SFTTrainer(
    model=model,
    train_dataset=dataset,
    dataset_text_field="text",
    max_seq_length=512,
    args=TrainingArguments(
        per_device_train_batch_size=2,
        gradient_accumulation_steps=4,
        warmup_steps=10,
        max_steps=100, # Number of training iterations
        learning_rate=2e-4,
        logging_steps=10,
        output_dir="gemma-enterprise-lora",
        optim="paged_adamw_8bit" # Memory-efficient optimizer
    ),
)

# 6. Execute Training!
print("🚀 Starting Fine-Tuning...")
trainer.train()

# 7. Save the Adapter
trainer.model.save_pretrained("gemma-enterprise-lora-final")
print("💾 Custom LoRA Adapter saved successfully!")
For our Agentic Architect blog series, adapting this code for a local MacBook Pro (Apple Silicon) requires a few specific "Edge AI" adjustments.
The biggest hurdle is that bitsandbytes (the library for load_in_4bit) currently only supports NVIDIA GPUs. For a local Mac, we replace 4-bit quantization with torch_dtype=torch.bfloat16. Since google/gemma-2-2b-itis only ~5GB in bfloat16, it fits beautifully on most modern MacBooks without 4-bit quantization.
Here is the adapted code for your notebook:
import torch
from transformers import AutoTokenizer, AutoModelForCausalLM, TrainingArguments
from peft import LoraConfig, get_peft_model
from trl import SFTTrainer
from datasets import load_dataset
# 1. Environment Setup for Mac
# Use the native arm64 environment you created
model_id = "google/gemma-2-2b"
# Set your Hugging Face Token (Never hardcode this in production!)
os.environ["HF_TOKEN"] = ""
# Note: We skip BitsAndBytesConfig on Mac as it's a CUDA-only library.
# Instead, we use bfloat16 which is natively supported by Apple Silicon's AMX.
print("🧠 Loading base model for Apple Silicon...")
model = AutoModelForCausalLM.from_pretrained(
    model_id,
    torch_dtype=torch.bfloat16,
    device_map="mps"  # Targets the Metal Performance Shaders (GPU)
)
tokenizer = AutoTokenizer.from_pretrained(model_id)
tokenizer.pad_token = tokenizer.eos_token # Essential for training
# 2. Define the LoRA Adapter Config
lora_config = LoraConfig(
    r=8,
    lora_alpha=16,
    target_modules=["q_proj", "k_proj", "v_proj", "o_proj"],
    lora_dropout=0.05,
    bias="none",
    task_type="CAUSAL_LM"
)
# Attach the adapter
model = get_peft_model(model, lora_config)
model.print_trainable_parameters()
# 3. Load Dataset
# Ensure enterprise_training_data.json exists in your directory
try:
    dataset = load_dataset("json", data_files="enterprise_training_data.json", split="train")
except Exception as e:
    print("Point to a valid JSONL file. Example format: {'text': 'User: Info\\nAgent: Response'}")
# 4. Initialize the Trainer (Optimized for MPS)
trainer = SFTTrainer(
    model=model,
    train_dataset=dataset,
    #dataset_text_field="text",
    #max_seq_length=512,
    args=TrainingArguments(
        per_device_train_batch_size=1,     # Small batch for local memory
        gradient_accumulation_steps=8,     # Simulates a larger batch size
        warmup_steps=10,
        max_steps=50,                      # Good for a blog demo
        learning_rate=2e-4,
        logging_steps=5,
        output_dir="gemma-edge-lora",
        # We remove 'optim="paged_adamw_8bit"' as it is CUDA-only
        # Default AdamW works great on MPS
        save_strategy="no",
        #use_mps_device=True                # Explicitly tells HF to use Mac GPU
    ),
)
# 5. Execute Training!
print("🚀 Starting Fine-Tuning on the Edge...")
trainer.train()
# 6. Save the Adapter
trainer.model.save_pretrained("gemma-enterprise-lora-final")
print("💾 Custom LoRA Adapter saved locally!")
The Payoff: Deployment
Notice what happens at the end of that script. You don't save a massive 10GB model. You save a tiny folder called gemma-enterprise-lora-final that is only a few megabytes in size.
When you deploy this to your offline Edge servers, you load the frozen Gemma base model, snap on your tiny custom adapter, and suddenly the model speaks your company's proprietary domain language flawlessly.
The Takeaway
Prepare Dataset: Create thousands of examples of
{"instruction": "...", "output": "..."}matching your desired behavior.Inject LoRA: Use the
peft(Parameter-Efficient Fine-Tuning) Python library to freeze Gemma and inject the adapter layers.Train: Run the dataset through the model. The loss function calculates errors, and backpropagation updates only the LoRA weights.
Merge & Deploy: Once trained, you merge the tiny LoRA adapter back into the base Gemma model and deploy it to your edge devices.
API wrappers are easy. Real enterprise architecture requires flexibility.
By mastering Google Cloud and Vertex AI, you can scale intelligence to millions of users globally. But by mastering local inference with open-weights models like Gemma, PyTorch, and LoRA, you can push intelligence into secure, air-gapped environments where the cloud cannot reach.
You are no longer just calling intelligence; you are hosting it.